Contents
- Introduction, setup, and base operation
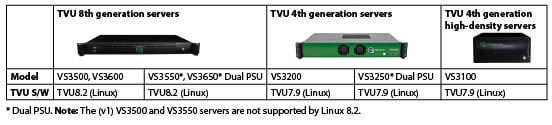
- Appliance cross-reference matrix
- Server front and rear panel overviews
- Setting up the server
- Setting up the Linux server
- Logging in to the Web UI
- Receiver configuration settings
- Product specifications – Model VS3600, VS3650, VS3500, and VS3550 servers
- Product specifications – Model VS3100 server
- Product specifications – Model VS3200 and VS3250 servers
- Network and firewall configuration
TVU Servers Linux v8.2 Hardware User Guide

Introduction, setup, and base operation
This TVU server hardware setup user guide provides instructions for setting up and configuring TVU server models VS3500, VS3550, VS3600, and VS3650. Use Linux v7.9 for Models VS3100, VS3200, and VS3250.
IMPORTANT: It is recommended that only Models VS3500 and VS3550 (v2-v7) hardware be upgraded to the v8.2 software build. The VS3600, and VS3650 (v1-v7) hardware can be upgraded to the v8.2 software build.
Note: The VS3500/VS3550 (v1) hardware is not supported.
Product overview
Refer to the “Appliance cross-reference matrix” for more information. Throughout this user guide, the TVU server may be referred to as the TVU server model, along with the following designations:
- TVU Model VS3100 high-density server
- TVU Models VS3200 and VS3250 servers
- TVU Models VS3500, VS3550, VS3600, and VS3650 servers
For advanced server configuration, refer to the “TVU Server Software User Guide, models VS3500, VS3550, VS3600, and VS3650 – Linux” as appropriate.
Standard components
The TVU server includes the following standard components:
- Server
- Power cable
Optional components include the following:
- Interrupt for broadcast (IFB) external USB interface
- Keyboard and mouse
- Regionalized power cord
This hardware guide provides information about the following topics:
- TVU server hardware overview and setup
- Understanding the faceplate controls and the operations panel
- Logging in to the TVU server
- TVU server Web interface overview
Appliance cross-reference matrix
Front panel overview (VS3200 / VS3250)
The TVU server (models VS3200 and VS3250) front panel features the following connections and controls, and runs Linux v7.9:
Rear panel overview (VS3200 / VS3250)
The TVU server (model VS3200) rear panel is shown with a single power supply and features the following components and connections:
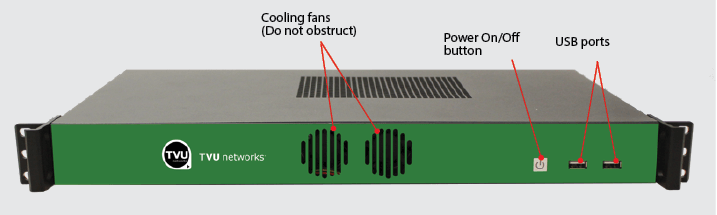
Front panel overview (VS3500, VS3550, VS3600, and VS3650)
The TVU server (models VS3500, VS3550, VS3600, and VS3650) front panel features the following connections and controls:
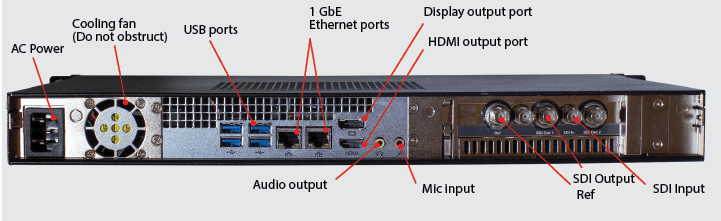
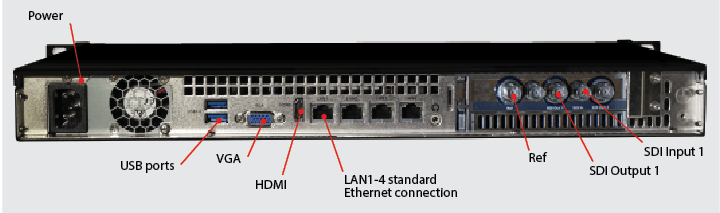
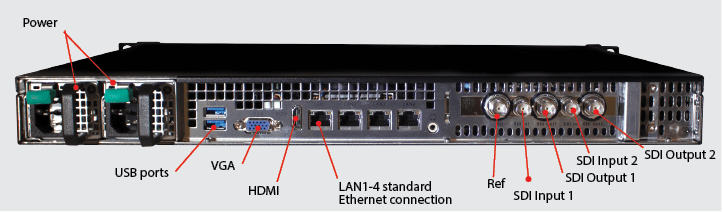
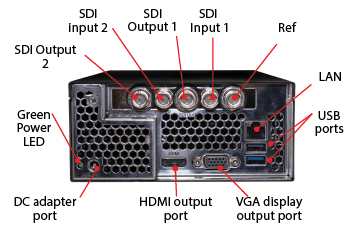
Rear panel overview (VS3500, VS3550, VS3600, and VS3650)
The TVU server (models VS3500 and VS3600) rear panel with the dual SDI card option features the following components and connections:
The TVU server (models VS3500 and VS3600) rear panel with the quad SDI card option features the following components and connections:
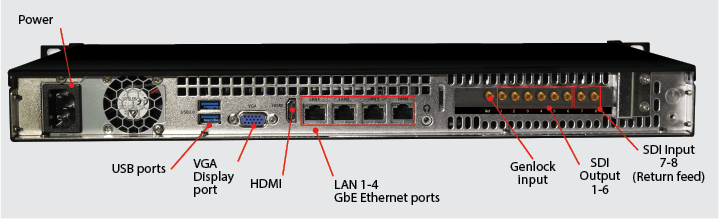
The TVU server (models VS3550 and VS3650) rear panel is shown with dual power supplies and a dual SDI card option, and features the following components and connections:
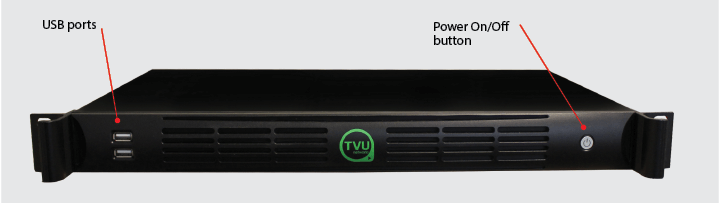
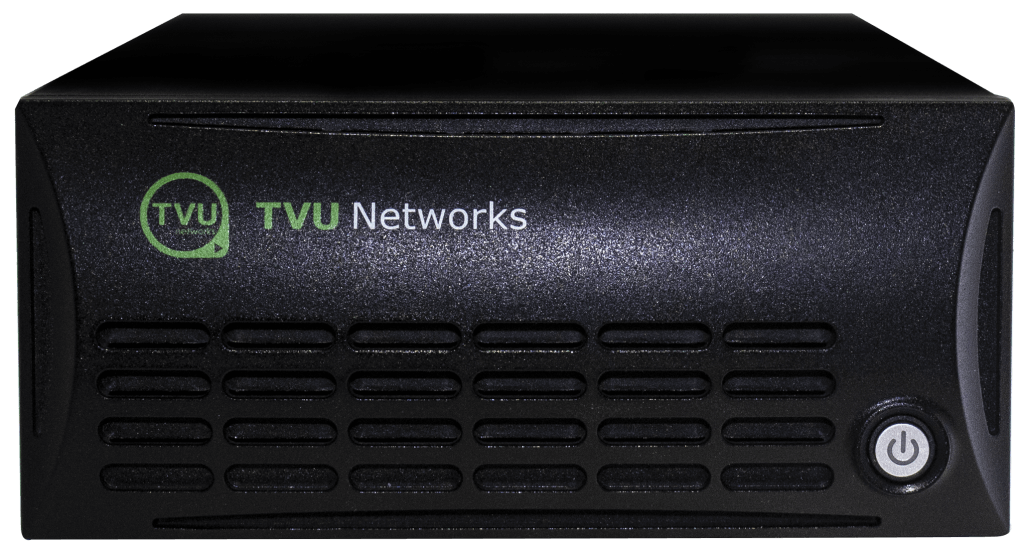
TVU high-density server front panel overview (VS3100)
The TVU high-density server front panel features the following connections and controls, and runs Linux v7.9.
TVU high-density server rear panel overview (VS3100)
The TVU high-density server rear panel features the following components and connections:
Note: Only use a TVU Networks supplied AC adapter with this unit.
IMPORTANT: Information regarding the supplied AC adapter:
The supplied AC adapter is designed to be used with an input voltage of 100-240 V AC.
Powering the TVU server on and off
Complete the steps in the following procedure to power the server on and off or to restart the unit.
- To power on the TVU server, press the square or circular power button on the front panel.
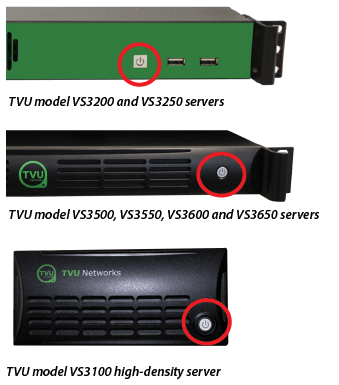
- To power off the TVU server, hold the power button down for four seconds.
Note: The TVU server will automatically restart if the power button is pressed and held in for less than four seconds.
- Complete the procedures to set up the TVU server.
Note: To assist with the setup procedures, refer to the front and rear panel overviews for the server connection descriptions and locations.
Before you begin
Before setting up the TVU server, TVU Networks recommends allocating a static IP address to the server to ensure the network configuration remains stable. All incoming ports in “Appendix A, Network and firewall configuration” are configurable. Please contact TVU Networks Customer Support at support@tvunetworks.com if you wish to use a configuration other than the one specified in this documentation.
Note: To assist with the software setup procedures, refer to the “TVU Server Software User Guide – Linux.”
Setting up the TVU Linux server
Complete the following steps to set up the TVU server:
- Connect the factory-supplied power cable to the server.
- Connect a monitor to the encoder using the HDMI or display port connections.
- Connect a keyboard and mouse to the encoder using the USB ports.
- Connect an Ethernet cable to one of the two Ethernet ports.
Note: Notice whether your server comes with a dual or quad SDI card.
- Connect the SD/HD-SDI video source to the SDI input port if your server has a dual card.
- If you have a high-density server, connect the HD/SD video source to the SDI port on the back of the server.
- To power on the TVU server, press the power button on the front panel.
Note: At boot-up, the TVU Receiver landing page displays.
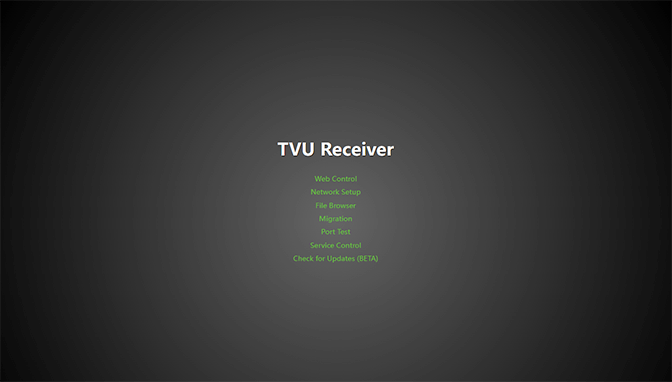
- Click Network Setup. The Receiver Web Control login page displays.
- Enter the following information:
User ID: tvu
Password: last 8 digits of the PID using all caps.
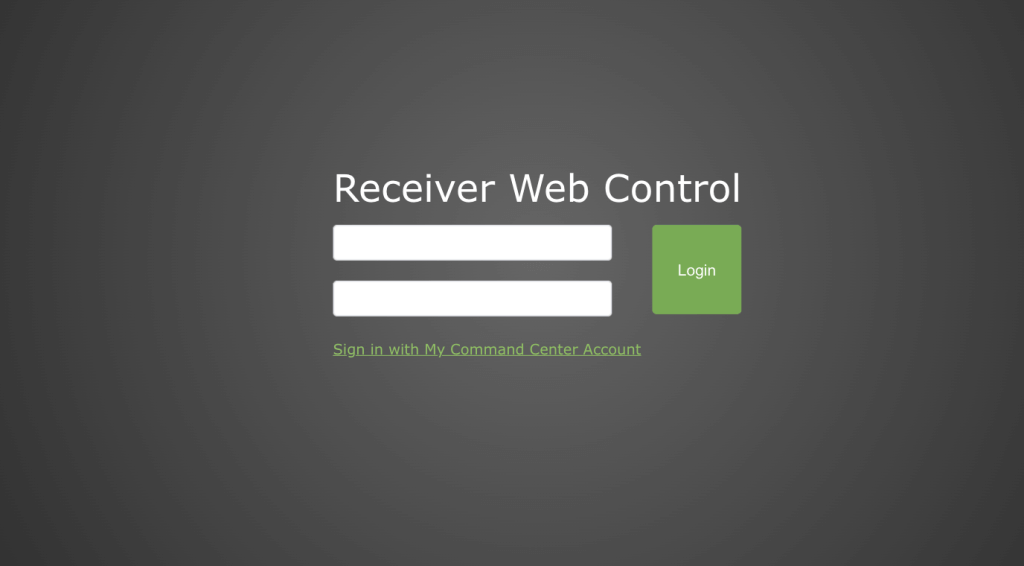
- Click Login. The TVU Network interface displays.
TVU Linux Receiver UI Network configuration
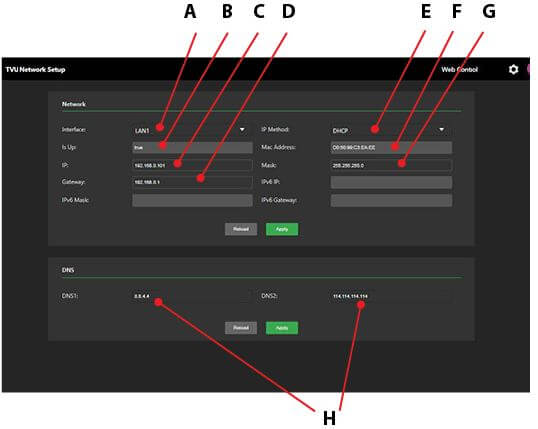
- In the Network setting panel, complete the following actions as indicated:
(A) Network Interface: Click the Interface drop-down menu to select an Ethernet adapter.
(B) Is Up: The Is Up setting displays the state of the selected Ethernet adapter.
(C) IP: When you select Static mode, you can enter the IP address in the field provided.
(D) Gateway: When you select Static mode, you can enter the gateway address in the field provided.
(E) IP Method: Click the IP Method drop-down menu to select a Static IP or DHCP address setting.
(F) Mac Address: The MAC address of the Ethernet adapter displays.
(G) Mask: When you select Static mode, you can enter the Subnet mask address in the field provided.
(H) DNS1 and DNS2: The DNS setting fields are displayed in the DNS panel.
- When finished, click the Settings (gear) icon and Restart Service from the drop-down menu.
- Continue with “Logging in to the TVU Server Web UI.”
Logging in to the TVU Server Web UI
To log in to the TVU receiver Web UI, have your server’s static IP address available and complete the following steps:
- Open a Web browser window and enter:
http://external_IP_Address:8288
(Where External_IP_Address is your server’s static IP address)
- Click Enter. The TVU Receiver landing page displays.
The Receiver landing page includes access to:
- Web Control – TVU Receiver Web UI
- Network Setup – Network and DNS setup
- File Browser – Recorded files and Profile settings
- Migration – R configuration restoration
- Port Test – Network diagnostics for inbound/outbound ports, and NTP status
- Service Control – Enable FTP Service, SSH Service, and Media Server.
- Check for Updates (BETA)
Note: For detailed information about the Receiver landing page refer to the TVU Server Software UG Linux v8.2.
- Click Web Control. The TVU Networks Receiver Web Control Login page displays.
- Enter the following information:
User ID: tvu
Password: Enter the last 8 digits of the PID using all caps
- Click Login. The TVU Receiver Web UI displays.

- To complete the setup procedure, continue with “TVU Linux Receiver UI configuration.”
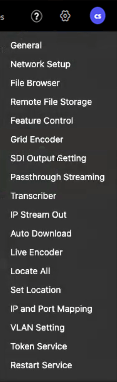
TVU Linux Receiver UI configuration
The TVU Receiver interface Settings drop-down menu in the top right panel displays several selections. These include accessing the Network setup page, selecting an output video format, configuring IP and port mapping, and accessing Web services.
Note: The Restart Service feature can now be accessed in the Settings drop-down menu to reset the WebR after enabling or disabling features.
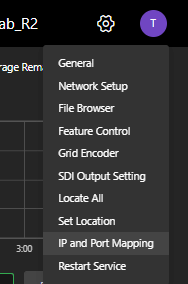
IP and port mapping
To configure IP and Port Mapping, complete the following steps:
- In the TVU Receiver User Interface, click the Settings menu in the top right corner of the screen and select IP and Port Mapping. For more information about port forwarding, refer to the latest “Port-forwarding guidelines” document.
The IP and Port Mapping window opens.
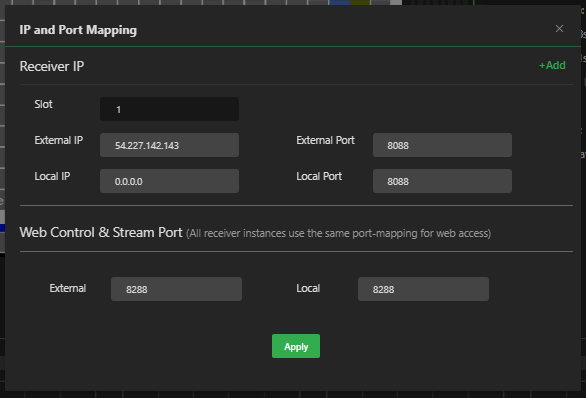
- Enter the External IP and Local IP address in the appropriate IP and Port Mapping fields. To add an additional slot, click +Add. Then, click Apply and close the window.
SDI output settings
To configure your video output format, complete the following steps:
- In the Settings drop-down menu, select SDI Output Settings.
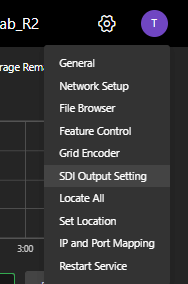
The SDI Output Settings window opens.
- Click the Output Format drop-down menu.
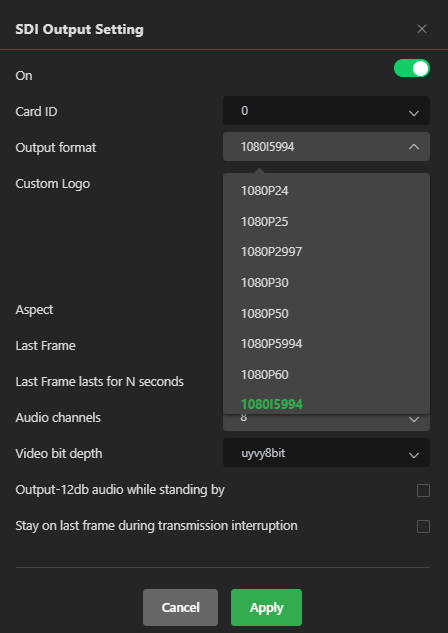
- Select a format from the menu, click Apply, and close the window.
Network setup page
- To access the Network settings page from the Receiver Web UI, select Network Setup from the Settings menu.
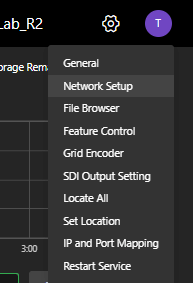
The Network setup interface opens in a new window.
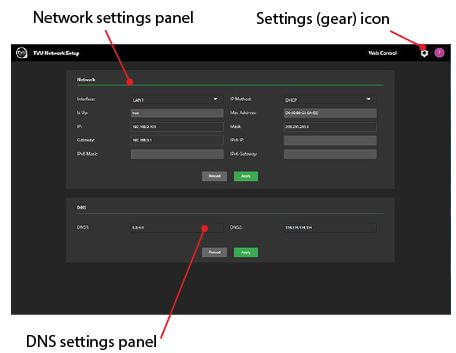
- To open the System settings menu, click the Settings (gear) icon in the top right corner of the Network interface screen.
- You can use the system settings menu to restart the service, restart the system, update the firmware, and shut down the server.
- To return to the Receiver user interface, click the Web Control icon in the top navigation bar.
- The TVU Receiver Web user interface displays.
Product Specifications – Model VS3600, VS3650, VS3500, and VS3550 servers
The TVU VS3600/VS3650 4K Server models are designed to host multiple TVU applications that can accomplish numerous tasks simultaneously, including SDI/IP encode and decode, frame-accurate IP video switching, graphics overlay, AI-based closed captioning, store and forward file transfers, and more. TVU Server is also the gateway to TVU Grid®, allowing IP content to be routed and distributed easily within your network or with partner networks.


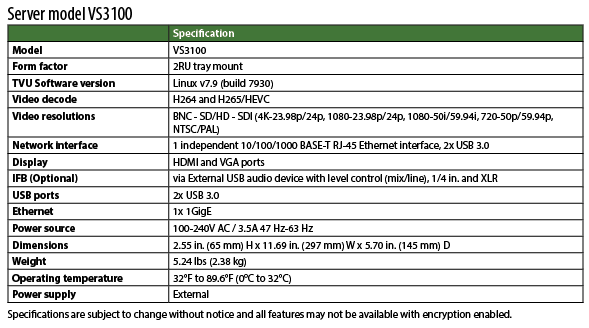
Product specifications – Model VS3100 high-density tray mount server
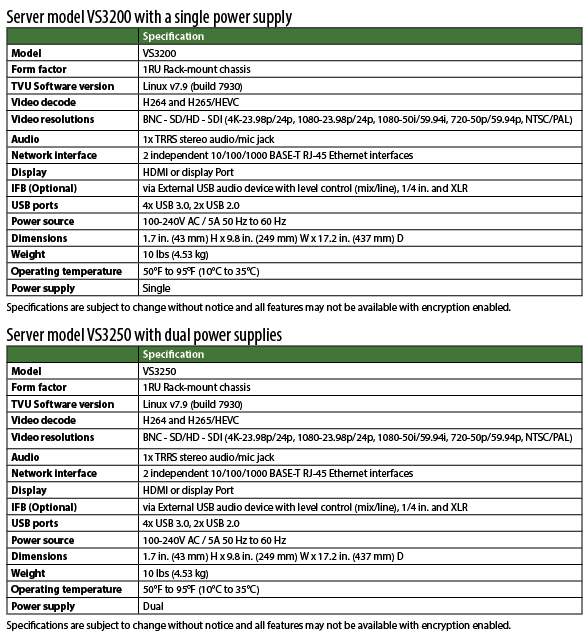
Product specifications – Model VS3200 and VS3250 servers

Appendix A – Network and firewall configuration
This section provides related support documentation for network and firewall configuration.
TVU Networks® recommends that you assign the TVU server a static IP address to ensure the network configuration remains stable.
Contact TVU Networks support if you want to use a configuration other than the one specified in the this user guide.
The following configuration allows the transmitters and servers to link automatically with each other and permit video transport.
Complete the following steps to configure your TVU Pack router or firewall:
- Allow TCP Outgoing traffic from the TVU server on port 3970.
- Allow UDP Outgoing traffic from the TVU server on port 123.
- Permit all TCP/UDP incoming traffic for port 8088 to the server.
- Forward all traffic arriving on port 8088 of the external firewall interface of the IP address of the TVU server.
Recommended firewall configuration for remote control of the server from an iPad or smartphone
The TVU Pack hotspot feature allows remote configuration of the TVU Pack server settings from a smartphone. To enable this feature, permit all TCP incoming traffic for port 8288 to the receiving terminal; forward all traffic arriving on port 8288 of the external firewall interface to the IP address of the TVU Receiver. This port is configurable.
Bandwidth requirements
TVU Networks recommends a stable, low-latency connection with guaranteed bandwidth for best results. Allowances should be made for the bandwidth of incoming TVU transmitter transmissions based upon the following criteria:
- Each TVU server can utilize up to 20 Mbps of downstream bandwidth per live video feed.
- A minimum of 20 Mbps upstream bandwidth per TVU server is required for all features to function efficiently.
TVU server port-forwarding guidelines
TVU has developed a separate internal document for port-forwarding information. Please refer to the latest “TVU Server Port-Forwarding Guidelines” for Models VS3100, VS3200, VS3250, VS3500, VS3550, VS3600, and VS3650. If you are a customer, contact TVU Support for detailed information.
© Copyright 2025 TVU Networks Corporation. All rights reserved in all media.
Document Part Number: TVU Server Hardware UG Linux v8.2 Rev J EN 04-2025